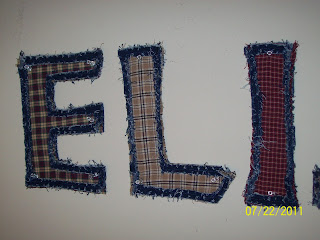
Now me...I was looking for letters to spell out my baby's name to hang over his crib. I didn't want to use the paper mache ones that you can paint or decoupage...I don't live close to a craft store and didn't want to order them online. I didn't want the wooden ones...for the same reason...I suppose I could have gotten one of my menfolk to cut the letters out for me...it's not like we don't have the supplies or tools to do so...however since getting one of the to take out the trash for me is a chore...I chose not to fight that battle!
Out of all my options I chose to use fabric as my medium! I have scraps from various projects running out my ears. I also knew that if Little Boy decided to grab one later in life and it went in his mouth...then no harm done! I also wanted to create something that could be used throughout his childhood if need be..I don't like things that I can't use for more than one purpose...it just seems wasteful to me! As our child will be sharing the bedroom with my husband and myself for the first year or so I also wanted his "corner" to at least coordinate with the current decor. Our bedroom is done in navy blues, maroons, and creams. So that is not really a difficult task!
I choose scraps of homespun cotton and denim for accents. When I originally made these letters I use an old pair of Tool Man's jeans...thinking that the faded and worn denim would rag the way I wanted it to....unfortunately I made two mistakes....one the denim was too heavy weighted and I got too happy with the sewing machine making my project overly complicated!
SEE! The one on the right was my first attempt at making these letters...you can't even see the cute fabric underneath the denim! However the letter on the left has just enough texture and contrast to be cute!
Now to start this project I got on my favorite Print Shop program and found a font that I liked and printed out each letter on a piece of card stock. I then cut each letter out...and made sure they looked "right". I didn't care for the J on the font that I used so ended up adjusting it a bit and making it look more J-like.
Next I assembled my supplies....I used scrap material, homespun cotton and denim. (on my first set I put a layer of batting in there two but later decided that it really wasn't needed!)
Next lay out each letter on your fabric and cut out three layers...two of your denim and one of cotton.
Now this is of my first attempt and shows the layer of batting....however you get the idea...just make sure when you cut out the denim you have right sides together....or vice versa...that way everything looks nice on the back to!
OK once everything is cut out...put your layers together and pin!
See you want a denim layer, cotton, unneeded batting and denim. Once everything is pinned you want to sew. I used a straight stitch and sewed a 1/4" seam all around each letter. This will hold your material together and allow you to cut out the inside.
Now for the tedious part....you want to get a very pointy sharp pair of scissors and carefully but out the inside top layer of denim from each letter. Try to leave an equal amount of material on either side of your stitching.
Now for the fun part....you want to go around the outside of each letter, cutting through all layers and clip about every 1/4" to 1/2" and go around the top inside layer of denim only and clip. Just don't clip that seam...get close but not close enough to clip through.
To finish you want to get these wet...if it were a blanket or something big I would tell you to wash it... but considering the size I just ran mine under the tap water in the sink and then threw them in the dryer for about 15 minutes! This will cause all that clipped material to "rag"! Making your letters super dimensional! I went back over all of mine when they were dry and trimmed up anything that looked too messy. Then all I had to do was attach them to the walls...I used thumb tacks temporarily...but will come up with something baby proof later on!
I just love them....and they look so cute over crib! The original idea came from another blogger who made these out of just cotton material....and used them to teach their toddler the ABC's ....unfortunately I have misplaced the original site! But there are many ways to modify this idea for many different applications!
God Bless,
Mama D


No comments:
Post a Comment